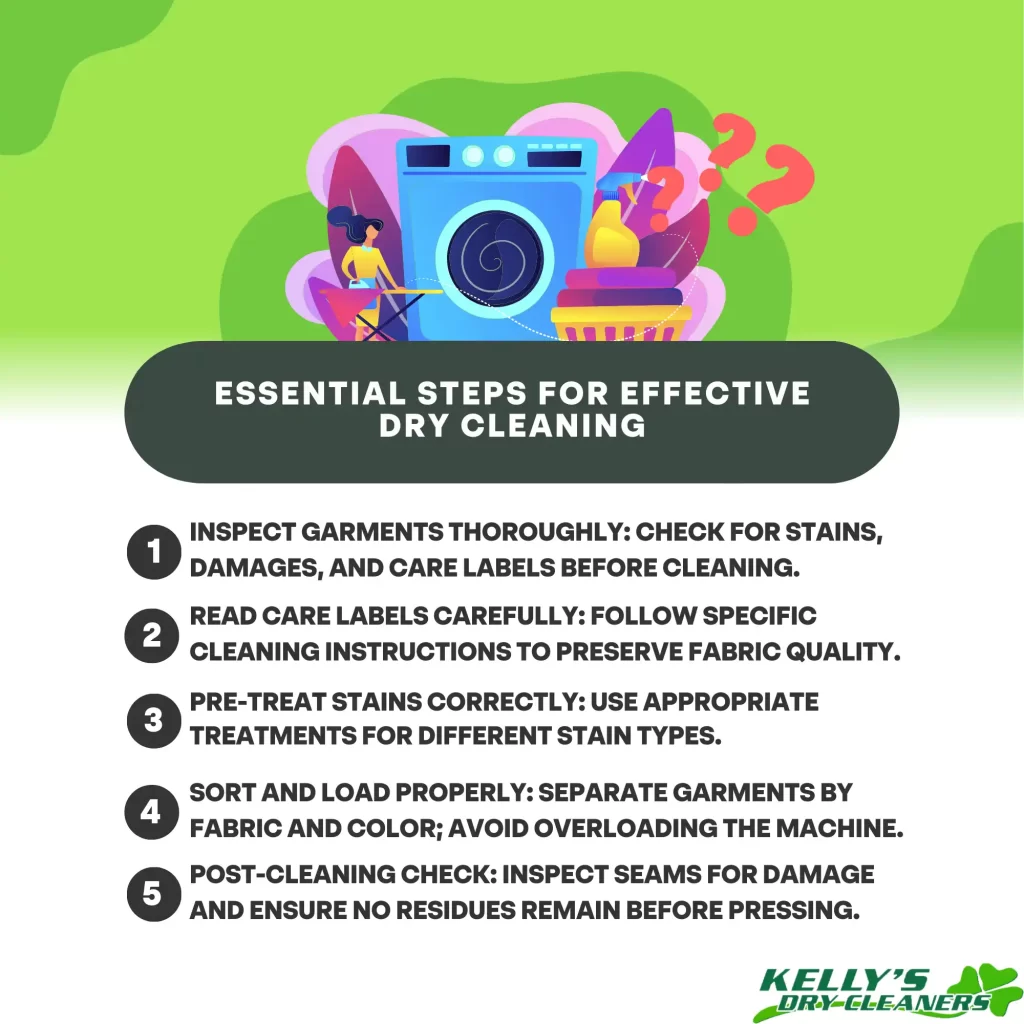
To master dry cleaning operations, start by thoroughly inspecting garments under bright light for stains and damages. Identify and interpret care labels to determine the appropriate cleaning method. Pre-treat stains with the correct solvent based on their type. Sort garments by fabric and color before loading the machine, guaranteeing it’s not overloaded. Initiate the dry cleaning cycle using a non-water-based solvent. Post-cleaning, inspect seams and check for residues, then press and finish the garments with proper technique. Each step guarantees precision and care for your clothing. Get deeper insights into each phase and improve your dry cleaning efficiency.
Key Takeaways
- Conduct a thorough garment inspection to identify stains and damages before cleaning.
- Read and understand care labels for fabric type and specific cleaning instructions.
- Pre-treat stains based on their type using appropriate treatments.
- Sort garments by fabric and color, and load the machine according to its capacity.
- Perform a post-cleaning inspection for seam integrity and residue before pressing and finishing.
Garment Inspection
Before beginning any dry cleaning process, it is vital to conduct a thorough garment inspection to identify any stains, damages, or special care instructions. First, examine each garment under bright light to spot any hidden or subtle stains. Pay particular attention to areas like collars, cuffs, and pockets where dirt and oils tend to accumulate. Note any stains, as this will help you understand how dry cleaning works and what specific treatments will be required.
Next, check for any damages such as loose seams, missing buttons, or frayed edges. Document these issues to avoid potential disputes later. Understanding the condition of the garment before cleaning guarantees that you know what to expect from the dry cleaning process.
Label Identification
Identifying the care labels on garments is important for guaranteeing that each piece is cleaned according to the manufacturer’s guidelines. Each label provides vital information, such as fabric type, recommended cleaning methods, and any special instructions. Start by locating the care label, typically found inside the neckline, side seams, or waistband of the garment.
When you read the care label, you’ll often see symbols indicating how to proceed. These symbols tell you whether the garment can be dry cleaned, washed, ironed, or bleached. Understanding these symbols answers the question, ‘how does dry cleaning work?’ Dry cleaning uses chemical solvents instead of water to remove stains and dirt without shrinking or damaging the fabric, which is particularly beneficial for delicate materials.
You need to be meticulous in reading these labels because what dry cleaning does is preserve the integrity of the fabric while maintaining cleanliness. Misinterpreting a care label can lead to irreversible damage. Always cross-reference the symbols with a reliable guide if you’re unsure.
Stain Treatment
Effective stain treatment is vital for maintaining the appearance and longevity of your garments. First, identify the type of stain you’re dealing with—oil-based, protein-based, tannin, or dye. This initial step is important as it determines the appropriate treatment.
For oil-based stains, use a solvent-based pre-treatment. Apply a small amount directly onto the stain and gently blot with a clean cloth. Avoid rubbing, as this can spread the stain. Protein-based stains, like blood or sweat, require an enzyme-based pre-treatment. Apply the enzyme cleaner and let it sit for 10-15 minutes before blotting.
Tannin stains, such as coffee or tea, respond well to a mild detergent mixed with water. Dab the solution onto the stain and blot until the stain lifts. For dye stains, use a color-safe bleach. Apply it sparingly and observe closely to guarantee the fabric’s color remains intact.
Always test any treatment on an inconspicuous area of the garment first to confirm it won’t cause damage. Once the stain is treated, you can proceed with the rest of the dry cleaning process. Remember, prompt and appropriate stain treatment is key to preserving your garment’s quality.
Loading the Machine
When loading the machine, you must first sort garments by fabric type and color to prevent damage and color transfer. Make certain you don’t exceed the machine’s load capacity, as overloading can compromise the cleaning effectiveness. Properly balancing the load will also help maintain the machine’s longevity and performance.
Sorting Garments Properly
Properly sorting garments before loading the machine guarantees ideal cleaning results and prevents damage to delicate fabrics. Begin by separating items based on their fabric type. This confirms that delicate materials like silk aren’t mixed with more robust fabrics like denim, preventing potential damage.
Next, check each garment’s care label for specific instructions. This step is essential for identifying items that require special treatment. Here’s a straightforward sorting process:
- Fabric Type: Separate silk, wool, cotton, and synthetic materials.
- Color: Group light-colored garments together and dark-colored garments separately to avoid color bleeding.
- Soil Level: Identify heavily soiled items and lightly soiled garments. Pre-treat stains accordingly.
- Special Instructions: Note any specific care instructions, such as ‘dry clean only’ or ‘hand wash.’
Once sorted, inspect each garment for any loose buttons, zippers, or embellishments. Fasten zippers, unbutton shirts, and remove any non-permanent accessories. These small details can prevent snags and other damages during the cleaning process.
Adhering to this detailed sorting process not only preserves the quality of your garments but also optimizes the dry cleaning machine’s performance. Following these steps guarantees each piece receives the appropriate care and attention it deserves.
Machine Load Capacity
After sorting your garments meticulously, it is crucial to understand the machine’s load capacity to guarantee ideal cleaning efficiency. Overloading the machine can lead to poor cleaning results and potential damage to both the garments and the equipment. Conversely, underloading wastes resources like solvent and electricity.
First, consult the machine’s manual to determine the specified load capacity, typically measured in pounds or kilograms. Check if the capacity is for dry or wet garments, as this can affect your calculations. Confirm you weigh your garments accurately; investing in a reliable scale is a good idea.
Load the machine evenly to maintain balance during operation. Distribute garments in a way that prevents bunching or tangling, which can result in uneven cleaning and increased wear. Be mindful of mixed fabric types; lightweight items should be separated from heavier ones to avoid damage.
Dry Cleaning Cycle
The dry cleaning cycle starts with the meticulous inspection and tagging of garments to guarantee each piece receives the appropriate treatment. You’ll need to identify stains, fabric types, and any special care instructions. This step makes certain that each garment is handled correctly throughout the process.
Next, pre-treatment involves applying specific cleaning agents to stains before the main cleaning cycle. This targeted approach helps in removing stubborn spots that standard cleaning might miss.
Once pre-treated, garments are placed in the dry cleaning machine. The machine uses a non-water-based solvent to clean the clothes. It operates through a cycle that assures thorough cleaning while protecting the fabric’s integrity.
Here’s a quick breakdown of the dry cleaning cycle:
- Loading: Place garments into the machine, making sure they’re not overcrowded.
- Washing: The machine tumbles clothes in a solvent that lifts dirt and oils.
- Extraction: Solvent is drained, and garments are spun to remove excess liquid.
- Drying: Clothes are dried in the same machine using warm air to evaporate remaining solvent.
Post-Cleaning Inspection
After the cleaning cycle, your first task is to meticulously examine the garment seams for any signs of damage or wear. Next, verify there are no residues left on the fabric that could affect its appearance or texture. These steps are essential for maintaining the quality and longevity of the cleaned item.
Examine Garment Seams
Carefully inspect each garment seam to confirm there are no signs of damage, misalignment, or loose threads post-cleaning. This step is vital for maintaining the garment’s structural integrity and guaranteeing customer satisfaction. Follow these steps to perform a thorough examination:
- Visual Inspection: Look closely at each seam under good lighting. Check for any obvious signs of wear and tear, such as fraying or splitting.
- Tactile Inspection: Run your fingers along the seams. Feel for any irregularities, such as bumps or areas where the stitching feels uneven. This tactile feedback can often reveal issues not immediately visible.
- Stress Test: Gently tug on the seams to see if they hold firm. Pay special attention to high-stress areas like underarms, crotches, and pocket edges. If a seam gives way, it needs immediate repair.
- Alignment Check: Verify that the seams align properly, especially on patterned fabrics. Misaligned seams can indicate improper handling or a need for more precise sewing.
Check for Residues
Once you’re satisfied that all seams are intact, it’s important to check for any residues left on the garment post-cleaning. Begin by laying the garment on a clean, flat surface under good lighting. Inspect every inch of the fabric, paying special attention to areas that commonly trap residues, such as underarms, collars, and cuffs.
Run your fingers gently over the material to feel for any stiffness or irregularities. If you notice any spots that feel sticky or oily, it’s essential to address them immediately. Use a clean, white cloth dampened with a small amount of cleaning solvent to gently blot the residue. Avoid rubbing, as this can damage the fabric.
Examine the garment both inside and out. Turn it inside out to check for any residues that might have been transferred during the cleaning process. Look closely at any embellishments or delicate areas where residues can be harder to detect.
Pressing and Finishing
In the pressing and finishing stage, it’s vital to use the right amount of pressure and steam to achieve a crisp, professional appearance. This step is significant for restoring the garment’s original texture and shape, guaranteeing it looks brand new. Here’s a detailed guide to help you master this process:
- Set the temperature and pressure: Adjust the pressing machine to the appropriate temperature and pressure settings according to the fabric type. Delicate fabrics require lower settings, while heavier fabrics need higher settings.
- Position the garment properly: Lay the garment flat on the pressing table, making sure there are no creases or folds. Align seams and edges precisely to avoid uneven pressing.
- Apply steam carefully: Use the steam function sparingly to relax fabric fibers and remove wrinkles. Too much steam can saturate and damage the fabric, so press down smoothly and steadily.
- Final inspection and touch-ups: After pressing, inspect the garment for any missed areas or remaining wrinkles. Use a hand iron for targeted touch-ups, making certain every part of the garment is flawless.
Conclusion
Now that you’ve journeyed through the meticulous steps of dry cleaning, you’re well-equipped to handle your garments with the utmost care. By inspecting, treating, and processing each piece, you’re fundamentally giving your clothes a spa day. Remember, attention to detail guarantees that every fabric is rejuvenated and ready to shine. Keep these steps close, and your wardrobe will thank you for the tender loving care. Consider yourself a steward of sartorial elegance!